Customizing default result template
Customizing the default results template in instant-search module
Use case:
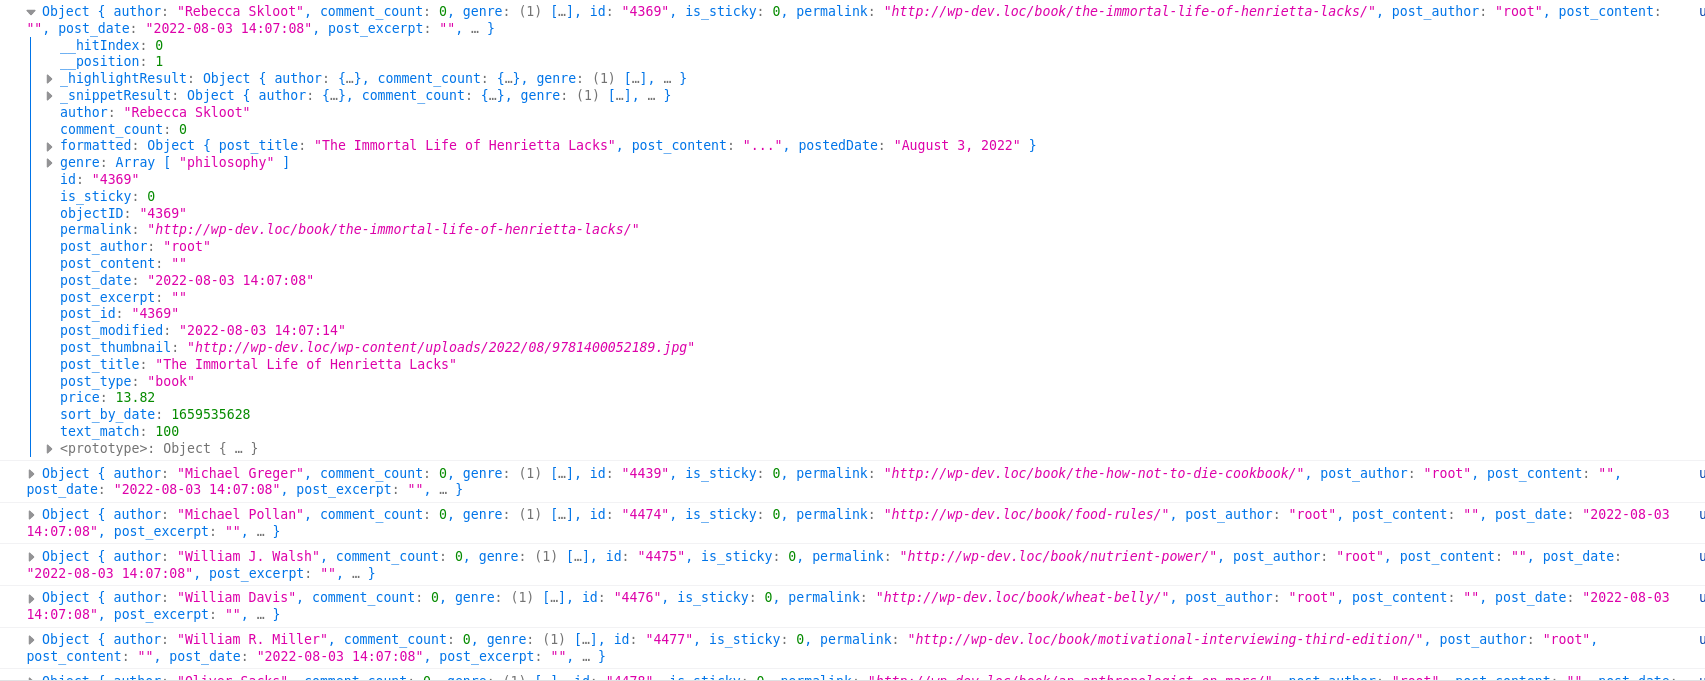
Suppose you added a new field for instance price in your schema and indexed it to TypeSense server. Now how to show the price in the result template?
To show the price in result tempalte, follow the steps below:
1. Register a custom template for your index type
First you have to register the custom template for your index type. The important part here is the id of the template.
If you look at the code below, notice the id of the script is tmpl-cmswt-Result-itemTemplate--book. The last part of the id must be value of the index type you are registering with the hook cm_typesense_available_post_types.
<?php
function cm_202208_add_book_hit_template() { ?>
    <script type="text/html" id="tmpl-cmswt-Result-itemTemplate--book">
        <div class="hit-header">
            <# if(data.post_thumbnail !== undefined) { #>
            <a href="{{{data._highlightResult.permalink.value}}}" class="hit-header--link" rel="nofollow noopener">
                <img src="{{{data.post_thumbnail}}}"/>
            </a>
            <# } #>
        </div>
        <div class="hit-content">
            <a href="{{{data._highlightResult.permalink.value}}}" rel="nofollow noopener"><h5 class="title">{{{data.formatted.post_title}}}</h5></a>
            <# if( data.post_type === 'book' ) { #>
            <div class="hit-meta">
                    <span class="posted-on">
                        <time datetime="">{{data.formatted.postedDate}}</time>
                    </span>
                <# if ( Object.keys(data.formatted.cats).length > 0 ) { #>
                <div class="hit-cats">
                    <# for ( let key in data.formatted.cats ) { #>
                    <div class="hit-cat"><a href="{{{data.formatted.cats[key]}}}">{{{key}}}</a>,</div>
                    <# } #>
                </div>
                <# } #>
                <# } #>
                <div class="hit-description">{{{data.formatted.post_content}}}</div>
                <div class="hit-link">
                    <a href="{{data.permalink}}"><?php _e( 'Read More...', 'search-with-typesense' ); ?></a>
                </div>
            </div>
        </div>
    </script>
<?php
}
add_action( 'wp_footer', 'cm_202208_add_book_hit_template' );
Note: The template above is the default template.
2. Showing the custom field
In our case we want to show our custom field price, for that we change the above code by adding this line:
<span class="price">Price: ${{{data.price}}}</span>
<?php
function your_prefix_custom_hits() {
    ?>
    <script type="text/html" id="tmpl-cmswt-Result-itemTemplate--default">
        <div class="hit-header">
            <# if(data.post_thumbnail !== undefined) { #>
            <a href="{{{data._highlightResult.permalink.value}}}" class="hit-header--link" rel="nofollow noopener">
                <img src="{{{data.post_thumbnail}}}"/>
            </a>
            <# } #>
        </div>
        <div class="hit-content">
            <# if(data._highlightResult.permalink !== undefined ) { #>
            <a href="{{{data._highlightResult.permalink.value}}}" rel="nofollow noopener"><h5 class="title">{{{data.formatted.post_title}}}</h5></a>
            <# } #>
            <# if( data.post_type === 'book' ) { #>
            <div class="hit-meta">
                <span class="posted-on">
                    <time datetime="">{{data.formatted.postedDate}}</time>
                </span>
                <span class="price">Price: ${{{data.price}}}</span>
                <# if ( Object.keys(data.formatted.cats).length > 0 ) { #>
                <div class="hit-cats">
                    <# for ( let key in data.formatted.cats ) { #>
                    <div class="hit-cat"><a href="{{{data.formatted.cats[key]}}}">{{{key}}}</a>,</div>
                    <# } #>
                </div>
                <# } #>
                <# } #>
                <div class="hit-description">{{{data.formatted.post_content}}}</div>
                <div class="hit-link">
                    <a href="{{data.permalink}}"><?php _e( 'Read More...', 'search-with-typesense' ); ?></a>
                </div>
            </div>
        </div>

    </script>
<?php
}
add_action( 'wp_footer', 'your_prefix_custom_hits' );
3. Debug what kind of data are availabe
To debug or see what values are avialable to use, you can add {{console.log(data)}} inside the template and see the available datas.
In our custom example, this will log something like this:
